The GypsyChicks

Repurposing With A Purpose

Archive for the month “March, 2015”

DIY Spring Baskets

image


Look at this adorable Spring Basket I made for one of my daughter’s friends.  So cute.  I have a fascination with strawberry and fruit baskets.  I collected quite a few of these on one of our many RV adventures on the road.  I found most of them at local farmers markets.  They were all so friendly to share.

Lately I have used these baskets to display gift towels, crocheted items, and now treats for my daughter’s friends.


image


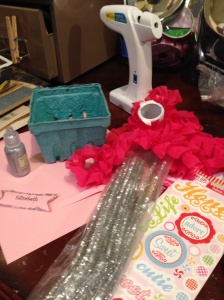
I gathered up my supplies; cute Strawberry basket, trusty hot glue gun and glue sticks, hole punch, frilly pink ribbon, pink cardstock, stickles glitter glue, “treat” themed stickers,  and shiney pipe cleaners.  All of these items I had stashed away in my scrap room.

image

I punched a hole centered on two sides of the basket,  fit the pipe cleaner on each end to make the handle, and cut off the excess.  I hot glued the ribbon around the top of the basket (cutting off the excess) for the decorative trim.  I then took some colorful stickers, backed them with pink card stock, and decorated all four sides of the basket with my trusty hot glue gun. Its not shown in the final picture, but I also made a tag out of the card stock with her friend’s name printed, outlined the tag and other stickers with the glitter glue.  You gotta have some glitter. Right!

Once your basket is decorated with the glitter, frills, and sparkles, just fill with whatever goodies or treats for the occassion.  I filled the basket with sparkley tissue, candy, and lip glosses. Her friend loved it all.


Pretty in Pink

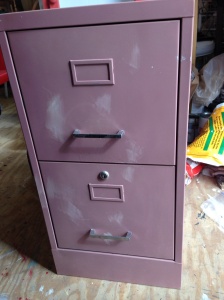
imageI found this lovely shabby pink file cabinet at a local estate sale. It screamed “take me home”, so I did. Feeling like some pink needed to be added to my booth for spring, this piece fit the bill. I wanted to add some shiney gold to give it a little something special.

So I got out some basic gold metallic paint and some butterfly stencils and got to work. I did prep the metal cabinet with a bit of light sanding, then laid my stencil in a fun pattern all over. Got out the sponge brush and got busy with it.

imageimage

I applied the stencil on top, the sides and the front.  Once the paint was dry. I sealed the cabinet with clear acrylic spray sealer.

TADA!! I think the cabinet turned out pretty good. A fun piece that would look great in any room of the home.

image

Food for the Soul

A week’s worth of creativity is food for the soul…….

in this previous post I provided detailed instructions about how I create wooden signs.

My focus last week was completing a dozen signs……….

Here are some of the results ……..

Wooden Signs

Family

Beautiful

Simplify

All you need is love

 All of these signs started off as scrap pieces of wood and masonite.

Process:

  • Paint – I used what I had  (2 coats)
  • Stencil – 2″, 3″ & 4″ letters (I outlined the letters w/a white watercolor pencil then filled in with paint)
  • Stained – left the stain on for a few minutes & wiped off
  • Sealed – I used crystal clear enamel spray

Most can be found here at my Etsy Shop.

Please feel free to post or email me with questions.

Thanks so much for stopping by our site!

Let class begin….

01037639a1f5ede7d7cff262c912683bd81aece546This piece brought back memories!

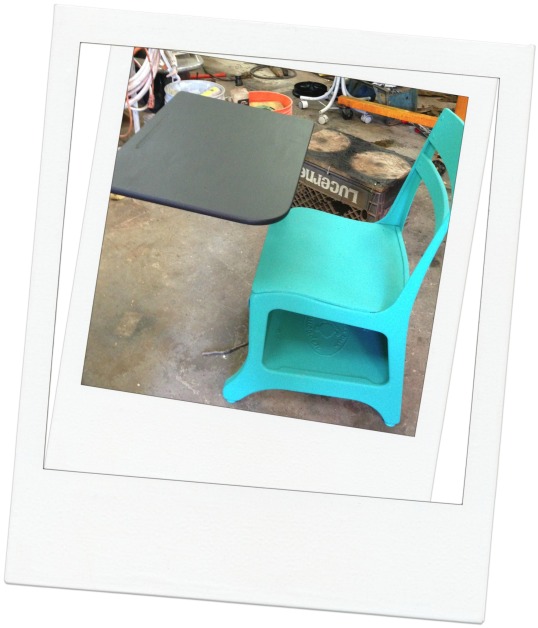
I found this old desk at a garage sale a while  back & wanted to give it a face lift.  After debating about my color scheme, I finally decided to go with the ever so popular CeCe Caldwell Chalk Paint in teal color & a chalkboard painted desk top.

The hardest part about this project was painting the inside of the bottom of the desk.  It was a bit of a tight space.

What have you found lately that brought back good memories?

Rusty Love

imageimage


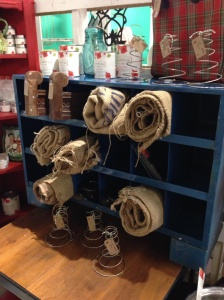
imageimageimageThere is something about rustic, industrial home decor, I just can’t seem to get enough of. This blue storage cabinet, which was recently added to our Gypsy Chicks booth, is the perfect example of organization in any room of the home. I can see kitchen plates and saucers, flatware, coffee mugs, and cookbooks  for the kitchen.

I actually wanted to keep this piece for my hobby room. Also known as the “everything crafty goes in this room”.  Can you imagine all the goodies, paper, fabric, and who knows what else I can get my hands on to fit in this cubby.

In the photo above, I stocked the cabinet with burlap, architectural wood pieces, coffee mugs, and acrylic letters. Loving the whole look.

Needless to say, everything rustic and industrial has caught my eye lately.  As you can see from the above party pics how the rustic industrial look is showing up through out our booth.  From the rusty coiled bed springs, to repurposed lamps, and metal tins, this look is starting to catch on.   Until next time…


Chalkboarding

Chalkboards are everywhere we look these days.

Even IF I were to make chalkboards & signs for the next 20 yrs, I don’t think I would be able to use all the scrap wood that seems to multiply like rabbits in our shop while we’re sleeping……

Soooooooo……. I decided to use the wood clutter we had lounging around our shop…… waiting for me to trip over it.

Cabinet doors turned chalkboards are hot items these days….. actually just about anything painted with chalkboard paint sells like

Chalkboard

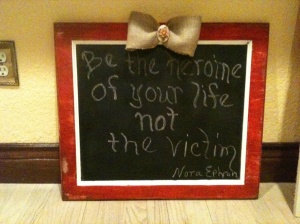
hotcakes.  I took this spare cabinet door & slapped some  barn red paint on it…… although red doesn’t seem to sell as well, at times, as other colors I really like deeper shades of red.

And yes, I will usually paint the back of my projects because it gives it a finished look even though I know some of you think it’s a waste of time & material.  I always think of a customer possibly having a cool & creative new idea to use my product; however, they might not be able to do so if the entire piece isn’t finished which in my mind might make or break the sale.

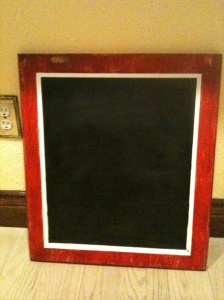
Anyhoo……after painting front & back……I painted 3 coats of chalkboard paint onto the front but left some of the original white paint showing  to frame it.

Cabinet door


Chalkboard cabinet door

I think the white frame gave it some nice extra detail.

I put a couple of coats of clear wax on the red painted area to seal it & added a burlap bow.

There you have it!  A cute fun & easy project


Too Cool for Spools……..

I enjoy creating……….this includes re-purposing & upcycling different items, distressing & painting furniture, scrapbooking, as well as mixed media.

I purchased a 10.5 x 13.5 pack of canvases & was rather intimidated by the blank white canvas staring back at me when I first started…………..

but……..I pressed on……….searching Pinterest for inspiration & researching various mixed media projects so I wouldn’t put my eye out or glue my fingers together forever by some mishap……..

Inspiration struck when I saw hearts on canvas on Pinterest but knew I wanted a 3-D look.

Keeping that in mind, I proceeded to paint, stain, distress, & stamp my canvas in a variety of espresso, copper, & coffee metallic paints, distress inks, & then layered with various scraps of paper – some distressed, some stamped, some embossed

I had a plethora of old wooden spools hanging out in some vase on a shelf waiting patiently to be used – I tied some ribbon scraps I had onto the spools to add texture

……….. a few dabs of E6000 later & a heart was born………topped some of the spools with vintage buttons just because

then I decided I needed a little metal action so I glued a metal plate & key in a couple of corners along with hanging a metal key on some jute in the middle of the heart

My guy made me a really cool frame (this pic does not do it justice)

image

image

image

This was a really fun project

Thanks so much for taking time to check us out!

Challenge:  Try a new technique, use a new product, or find a project to replicate adding your own spin

Why Have Hobbies?

Good insight

Aunt Beulah

In a recent Peanuts cartoon, when Lucy told Charlie Brown she was thinking of starting some new hobbies, Charlie said, “That’s a good idea, Lucy. The people who get most out of life are those who really try to accomplish something.”

Looking appalled, Lucy replied: “ACCOMPLISH something? I thought we were just supposed to keep busy.”

In the past, I thought like Lucy. Viewing hobbies as busy work to fill my idle moments, I pursued decoupage, macramé, origami, tatting, and yodeling. Each endeavor enjoyed the same success as my wish to be 5’6”.Wreath

My search for a busy-work hobby peaked when I scoured fields and ponds for nuts, pinecones, grasses, and twigs, which I used to make Christmas wreaths. I gave these creations to loved ones, who exclaimed happily and hung them in their snug homes.

I had used liberal amounts of a smelly liquid adhesive to attach my found…

View original post 343 more words

Bur-lamps

Thrift stores have a wealth of resources for re-purposing……….which is where this little lamp came from……….

I wish I’d taken a picture of the “before” because it was a maroon-purple-ish color on the base……….screamed 1980’s………..big hair & Bon Jovi……….

She needed a face lift & little TLC………….

I lightly sanded the base so the paint would grip better……….

painted with a chrome metallic silver paint……….

found a shade that fit – in fact I think I had that lamp shade in my stash………

added a burlap sash & flower

image

She looks much better & sophisticatedly vintagy (yes I sometimes make up my own words)

Do you have a small item that needs a face lift with a fresh coat of paint?


Plan On It!

It seems there is a new hot trend, or maybe an old trend with a few new twists. Planners! From daily planning, budget planning, health & diet, to blog planning. Another twist is memory planning. Which is the one I have been drawn to. A mix of planning, journaling, art, scrapbooking, and goal setting.  I am new to this kind of planning, and it has definitely been a trial and error experience.


It all started for me when I discovered the Heidi Swapp, gold memory planner from Michaels,  “Everyday”. On Sale too! I have since discovered this may have been a limited edition, for I can’t seem to find anymore, anywhere!  Grrrr!

I love the shiny gold, and the size. It came with all sorts of goodies. From post it’s, number stamps, embellishments, and magnet tabs.  12 month dividers, a month at a glance, a thankful page , a page for notes, and a place for photos.

image            image


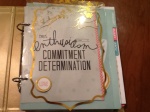
I promise to take better photos in the future. I have quickly figured out the memory planning is all about expressing yourself with color, and pens, glue and glitter, magazine clippings, paper, and lots of washi tape. I am on the hunt for washi tape and sticky notes. So watch out Target shoppers, here I come.  Basically, whatever you want to use, you can, so go for it.

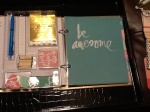
I do want to show the front inside cover, and dashboard.

image       image

Like I said before, all still works in progress. I used scrapbook paper and coordinating embellishments I had on hand. An acrylic insert from a media package. And glue! I made two pockets on the inside cover to hold paper clips, sticky notes, and a few “to do” lists.  I made sure to make note on my acrylic dashboard my word for 2015. Love. Love is my theme, and I plan to incorporate this theme throughout my planner.  More to come in this adventure of memory planning.


Post Navigation